Model XS Battery WashEdition EN · 09 / 2026 · V1 Document No. XSBW-EN-01
Battery LED Wash · W-DMX · IP65
XS Battery Wash
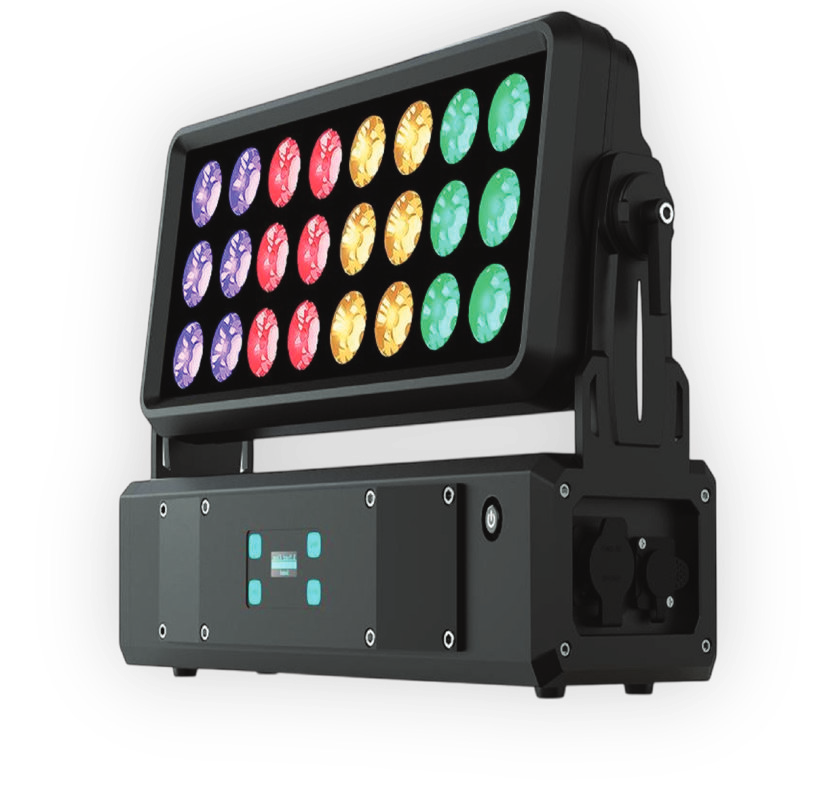
24 × 10 W RGBW battery wash with W-DMX wireless and Wi-Fi app control — mains-independent thanks to lithium-ion battery
Operating manual. Please read in full before first use and keep for future reference.
Light source
24 × 10 WRGBW 4-in-1 LED
Battery life
up to 14 hlithium-ion
Control
W-DMX4 – 32 channels · Wi-Fi
IP rating
IP65temporary outdoor
Luminus XS Battery WashForeword · About this document
Foreword
00Welcome
Thank you for choosing the Luminus XS Battery Wash — a mains-independent RGBW wash light with 24 × 10 W LEDs, integrated lithium-ion battery, wireless W-DMX control and IP65 protection for temporary outdoor use.
This document describes set-up, battery operation, wireless and Wi-Fi control, operation, care and troubleshooting of the fixture. Read the manual — in particular the chapter Safety Instructions — in full before first use and keep it with the fixture. If the fixture is passed on to third parties, the manual must be included.
0.1Symbols used
WarningMarks situations in which persons may be injured or the fixture may be damaged. Always observe these instructions.
NoteMarks useful additional information, tips or explanations that aid understanding.
Danger — battery & voltageMarks situations involving risk of fire or injury from the lithium-ion battery or from electric current. Work on the battery or on live parts is reserved for qualified personnel only.
0.2Intended use
The XS Battery Wash is a professional battery-powered wash light for events, stages, broadcast and film productions, weddings and architectural and landscape lighting. Thanks to its IP65 rating, temporary outdoor use in damp conditions is permitted — permanent, unprotected outdoor operation is considered improper use.
Read this chapter in full before first use. Damage caused by disregarding these instructions is excluded from the warranty.
1.1General safety
Danger to life from electric currentFor charging, use only the supplied Seetronic TR cable on a mains socket with AC 100 – 240 V, 50 / 60 Hz. Damaged cables or plugs must not be used. Disconnect the fixture from the mains during thunderstorms.
The fixture has a permanently installed lithium-ion battery. Never open, pierce, crush or burn the fixture — risk of fire and explosion.
Keep a minimum distance of 50 cm from illuminated surfaces and flammable materials (curtains, decoration).
Do not look directly into the LED source from a short distance — glare and risk of eye damage.
Do not cover ventilation openings and ensure unobstructed heat dissipation at the heat sink.
Operate and charge the fixture only within an ambient temperature range of 0 – 40 °C.
There are no user-serviceable parts inside. Repairs and battery replacement by authorised personnel only. Use only original spare parts of the same type.
In the event of serious operating problems, stop using the fixture immediately and contact service.
High surface temperature · over-temperature protectionThe heat sink can become hot during operation. An integrated protection automatically reduces brightness by 30 % from 75 °C and switches the fixture off from 95 °C. Allow the fixture to cool before handling.
Luminus XS Battery Wash01 · Safety Instructions
1.2Battery, charging & outdoor use
The XS Battery Wash operates both mains-independently from the internal battery and permanently on mains power. Observe the following notes for safe and long-lasting battery operation.
Lithium-ion batteryNever charge the fixture unattended or on a flammable surface. Do not expose the battery to heat above 45 °C. In case of a swollen housing, deformation, odour or heat build-up, disconnect from the mains immediately and contact service.
Charging
Charge only with the supplied Seetronic TR cable and only indoors at 0 – 40 °C.
A charging indicator appears on the display during charging. The fixture can be operated while charging (see chapter 3.1).
Before extended storage, charge the battery to approx. 50 – 70 % and recharge at least every three months.
Outdoor use (IP65)
IP65 rating — temporary outdoor useThe fixture is dust-tight and protected against water jets, but not approved for permanent, unprotected outdoor operation. Do not place the fixture in standing water. Keep the Seetronic TR cover firmly closed during battery operation.
Placement & mounting
Place the fixture on a level, load-bearing surface or mount it on a stand or truss via the mounting bracket.
When hung, additionally secure with a safety cable approved for at least 10 kg in accordance with national regulations.
Ensure adequate ventilation — minimum distance 50 cm on all sides.
Check housing, lenses, filters and cables for damage before each use.
Charge the batteryConnect the Seetronic TR cable to the fixture and a mains socket. The charging indicator appears on the display. Fully charge the battery before first use.
Place or mountPlace the fixture on a level surface or attach it to a stand / truss via the bracket and secure with a safety cable. Keep at least 50 cm clearance on all sides.
Power onSwitch on the fixture. On start-up the display shows the current DMX address and operating mode.
Set address & modeSet the DMX start address and channel mode on the display (see chapter 4) — or activate auto, sound, wireless or Wi-Fi operation.
Optional: fit a filterIf required, place the optional magnetic holographic filter (25°, 30° or 45°) on the cleaned, dry front.
Operation while chargingTo use the fixture while charging, press the MENU button below the charging indicator to switch to operating / run mode.
Operating mode (runtime)
In the Run Time menu, choose between full power and economy mode. Economy mode significantly extends battery runtime.
Mode
Runtime
Normal
approx. 7 h
Economy
up to 14 h
Luminus XS Battery Wash03 · Set-up
3.2W-DMX wireless & master / slave
Activate wireless in the menu Wireless ▶ DMX ON. One fixture acts as transmitter (master), all others as receivers (slaves). The wireless LED indicates the status:
Wireless LED
Meaning
Slow red flashing
Fixture is master and transmits wireless data
Slow green flashing
Fixture is slave and receives wireless data
Off
Wireless deactivated (“Wireless DMX OFF”)
Transmitter (master): receives DMX from the console or runs an internal program and transmits it via 2.4 GHz radio to all receivers.
Receivers (slaves): adopt the wireless data of the same group ID.
Group ID 1 – 7: separates several independent wireless links at the same location. Master and its slaves must use the same ID.
Radio band coloursFour 2.4 GHz bands can be selected in the Wireless menu; the assigned indicator colours are 01 red · 02 green · 03 blue · 04 white.
3.3Wi-Fi app & IR remote control
The fixture can be controlled via smartphone using the “LED LAMP” app.
Install the appInstall the “LED LAMP” app on your smartphone.
Activate Wi-Fi modeMenu ► Program ► WIFI
ConnectSelect and connect to the “LED-XXX” network in the smartphone Wi-Fi settings.
ControlOpen the app and wait for the connection — ready for control.
The supplied IR remote control directly controls brightness, colours, auto, strobe, fade and sound programs — activate IR ▶ ON in the menu. A complete button overview is given in chapter 06.
Luminus XS Battery Wash04 · Menu Map
Chapter 04
04Menu Map
The LCD display shows the current menu level, battery / charging status and wireless status (e.g. “Address A001 · CH 11 · BATT 86 %”). Four buttons are used for navigation.
Button
Function
MENU
Select function / back without saving
UP
Increase value / up
DOWN
Decrease value / down
ENTER
Confirm selection / save
Setting the DMX address
Navigate to “Address” with MENU and confirm with ENTER.
The display shows “A001”. Change the start address (001 – 512) with UP / DOWN.
Save with ENTER — or exit without saving with MENU.
4.1Menu structure
Menu item
Range / options
Function
Address
001 – 512
DMX start address
Channel
4 · 6 · 11 · 16 · 32 CH
DMX channel mode
DMX Fail
Hold · Blackout
Behaviour on signal loss
Curve
Curve 1 – 4
Dimmer curve: linear, square, logarithmic
Custom
R / G / B / W 0 – 255
Manual colour mixing
Program
Dim · Color 1 – 15 · Strobe
Internal colour / strobe programs
Auto
Mode 0 – 27 · Speed 1 – 16
Auto show program
Sound
On / Off · Sens 0 – 100
Sound-activated colour change
WIFI
LED-XXX
Wi-Fi mode & app pairing
Master / Slave
Master · Slave
Select wireless role
Wireless
DMX ON / OFF · Group 1 – 7
2.4 GHz wireless on / off & group
Run Time
Normal · Economy
Battery operating mode
IR
ON · OFF
IR remote control
Menu Lock
ON · OFF
Key lock
Back Light
20 s · 30 s · 40 s
Display standby
Factory Reset
NO · YES
Factory settings (ENTER + DOWN)
Information
Version V1.0
Software version
In the “A001” state, hold ENTER for 3 s to enter calibration mode; ENTER again for colour selection, UP / DOWN for the value, MENU to go back. Supports wired RDM and software online upgrade.
Luminus XS Battery Wash05 · DMX Channels
Chapter 05
05DMX Channels
The XS Battery Wash offers five channel modes — from simple colour control to full individual pixel control. Select the mode in the “Channel” menu.
Channels
Mode
Content
4
Basic
RGBW direct
6
Standard
+ dimmer & strobe
11
Extended
+ macros & speed
16
Pixel pairs
8 zones in pairs
32
Pixel full
8 zones individually
5.14- / 6- / 11-channel mode
CH
4-channel
Value
1
Red
0 – 255
2
Green
0 – 255
3
Blue
0 – 255
4
White
0 – 255
CH
6-channel
Value
1
Master dimmer
0 – 255
2
Strobe
0 – 255
3 – 6
Red · green · blue · white
0 – 255 each
CH
11-channel
Value
1
Master dimmer
0 – 255
2
Strobe
0 – 255
3
Colour macro (Color App)
0 – 255
4
Program / mode
0 – 255
5
Speed
0 – 255
6 – 7
No function
—
8 – 11
Red · green · blue · white
0 – 255 each
CH 3 value
Colour macro
0 – 17
Red
18 – 35
Green
36 – 53
Blue
54 – 71
White
…
Mixed colours
236 – 251
Red + white
252 – 255
All LEDs on
CH 4 value
Program / mode
0 – 9
Dimmer mode
10 – 17
Program 1
18 – 45
Program 2
46 – 65
Program 3
…
Further programs
230 – 245
Sound mode 1
246 – 255
Sound mode 2
CH 5 (speed) controls the speed of the programs and sound modes selected via CH 4. CH 8 – 11 act as manual RGBW values as long as CH 3 / CH 4 are set to 0.
Luminus XS Battery Wash05 / 06 · Pixel modes · IR remote control
5.216- & 32-channel pixel mode
The 24 LEDs are divided into eight pixel zones. In 16-channel mode two zones are combined into one pair; in 32-channel mode each zone can be controlled individually in RGBW.
Pixel mappingThe pixel modes are suitable for chase, gradient and running-light effects across several fixtures. Ensure sufficient address spacing: 16 CH or 32 CH per fixture.
Chapter 06
06IR Remote Control
Use the supplied infrared remote control to directly control brightness, colours and programs. First activate IR ▶ ON in the menu and point the remote at the IR receiver.
Button
Function
DIM + / DIM −
Increase / decrease brightness
ON / OFF
Light on / resume operation · light off / pause
R · G · B · W
Four single colours
1 – 9
Nine mixed colours
AUTO
Colour-change program (UP / DOWN: tempo)
STROBE
Strobe (UP / DOWN: tempo)
FADE
Colour fade (UP / DOWN: tempo)
SOUND
Sound control (UP / DOWN: mode)
Luminus XS Battery Wash07 · Troubleshooting
Chapter 07
07Troubleshooting
Below you will find solutions to the most common problems. For other faults, contact your dealer or Luminus service.
Problem
Possible cause
Solution
Fixture does not respond
Battery empty
Connect Seetronic TR and charge
Short runtime
Full-load operation (Normal)
Select “Run Time ► Economy”
Does not charge
Wrong cable / temperature outside 0 – 40 °C
Use original Seetronic TR, adjust environment
No DMX response
Wrong address or channel mode
Check address & “Channel” (ch. 4)
No wireless
Wireless off / wrong group ID
“Wireless DMX ON”, same group ID on master & slave
Wi-Fi app cannot find fixture
Not in Wi-Fi mode
“Program ► WIFI”, connect to “LED-XXX”
IR has no effect
IR deactivated / line of sight blocked
“IR ► ON”, point at the receiver
Brightness drops by itself
Over-temperature from 75 °C
Let it cool down, ensure ventilation
Fixture switches off
Over-temperature from 95 °C
Let it cool down, lower ambient temperature
Buttons without function
Key lock active
“Menu Lock ► OFF”
Wrong colours
Colour macro / program active
Set CH 3 / CH 4 to 0, mix manually
Factory settingsIf the behaviour remains unclear, reset the fixture via “Factory Reset ▶ YES” (ENTER + DOWN). All settings will be lost.
Repairs by qualified personnel onlyNever attempt to open or repair the fixture yourself — especially not the battery. Repairs carried out by unqualified persons can lead to damage and void the warranty.
Regular care maintains light output and battery capacity. Disconnect the fixture from the mains and let it cool down before cleaning.
Cleaning
Clean the front lens and optional filters with a soft, lint-free cloth; if necessary, lightly dampen with water or mild glass cleaner.
Do not use harsh solvents, abrasives or high-pressure cleaners.
Clean the housing and ventilation openings more frequently when used in damp or dusty conditions.
Keep the Seetronic TR socket and seals dry and clean to maintain the IP65 protection.
Battery care & storage
Store the fixture dry at 10 – 25 °C, away from heat and direct sunlight.
Before extended storage, charge the battery to approx. 50 – 70 % and recharge at least every three months.
Avoid deep discharge — a permanently empty battery loses capacity.
Transport the fixture in a flight case or the original packaging; keep filters in their case.
8.1Service intervals
Visual inspection of cables & seals
before each use
Clean lens & filters
monthly / as required
Recharge battery (storage)
every 3 months
Inspection by qualified personnel
annually
DisposalThe fixture contains a lithium-ion battery and must not be disposed of with household waste. At the end of its service life, hand it in at a suitable collection point for waste electrical equipment.
Luminus XS Battery Wash— · Quick Reference & CE
Appendix
AQuick Reference Card
Quick Reference
XS Battery Wash · DMX & Wireless
DMX modes
4 CH
R · G · B · W
6 CH
Dim · strobe · RGBW
11 CH
+ macro · program · speed
16 CH
8 zones in pairs
32 CH
8 zones individually
Menu quick access
MENU
Menu / back
UP / DN
Change value
ENTER
Confirm / save
Address
001 – 512
Run Time
Normal · Economy
Wireless & Wi-Fi
Wireless
DMX ON / OFF
Group
ID 1 – 7 (master = slave)
LED red
Master transmits
LED green
Slave receives
WIFI
App “LED LAMP” → LED-XXX
IR buttons
ON / OFF
Light on / off
DIM ±
Brightness
R G B W · 1–9
Single / mixed colours
AUTO · FADE
Colour change · fade
STROBE · SOUND
Strobe · sound
First aid — fault diagnosis
—
No light? → charge battery (Seetronic TR)
—
No DMX? → address & channel mode
—
No wireless? → DMX ON, same group ID
—
Dimmer? → over-temperature, cool down
BEU Declaration of Conformity
The manufacturer declares under its sole responsibility that the Luminus XS Battery Wash complies with the relevant EU harmonisation legislation (LVD 2014/35/EU, EMC 2014/30/EU, RED 2014/53/EU, RoHS 2011/65/EU). The signed EU Declaration of Conformity is available as a separate document and can be requested from Lexvision GmbH, Waldweg 26, 54636 Sefferweich, Germany, by email to verkauf@lexvision.de or by phone on +49 (0) 651 14567727.
Luminus XS Battery Wash · Operating Manual · Edition EN 09/2026 · V1 · Document No. XSBW-EN-01 · Subject to technical changes and errors.